Transferring data between two ESP32s via SPI pins
July 07, 2023
Image source: a pretty bad creation by Dall-E
As part of my high altitude balloon (HAB) project I have decided to use two LoRa transmitters in my first flight. I tried running the two LoRa RFM9x modules from a single ESP32 or Raspberry Pi Pico microcontroller, but in the end decided that it would be too much effort and the end result would be hacky/messy.
For example, I want to put my main controller to sleep periodically to save battery, however this is not suitable for devices which transmit data to The Things Network via LoRaWAN, because the LoRaWAN credentials get wiped each time, meaning the LoRa device will need to join the network again each time, which is wasted time and resources.
I’ve therefore decided to add two ESP32s - each one with a separate LoRa transceiver which operate on different frequencies.
I only have one GPS receiver, and don’t think it’s worth adding another one to the payload because of weight and cost concerns, so have decided to use a single GPS receiver which is used to send location data to both ESP32s. This has led me to configuring one ESP32 to pass data to the other ESP32, which I’ll briefly document in this post.
Using SPI with ESP32
When learning Arduino you will likely have transferred data between a microcontroller and an external module/device using UART - a simple method of data transfer which requires only two wires (Rx and Tx).
Although the UART data transfer process is easy, it’s has a low transfer speed and is more difficult to connect multiple devices to a single device.
SPI (serial peripheral interface) instead uses 4 wires (CS, SCLK, MISO, MOSI) and is faster than UART. SPI uses the concept of a controller (sometimes called a master) and multiple peripherals (sometimes called slaves). That is to say that there is always one controller device which sends/receives data to multiple peripheral devices.
Another benefit is that ESP32s have two sets of SPI pins:
- HSPI - can connect to three peripherals
- VSPI - can also connect to three peripherals
This means a total of 6 peripherals can be connected to a single ESP32 controller device. I am only interested in connecting one peripherals to one controller device for my project.
ESP32 SPI pins
Almost all ESP32s have pre-configured SPI pins:
| SPI | MOSI | MISO | SCLK | CS |
|---|---|---|---|---|
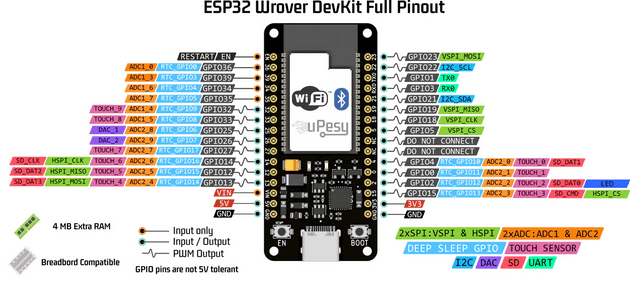
| VSPI | GPIO 23 | GPIO 19 | GPIO 18 | GPIO 5 |
| HSPI | GPIO 13 | GPIO 12 | GPIO 14 | GPIO 15 |
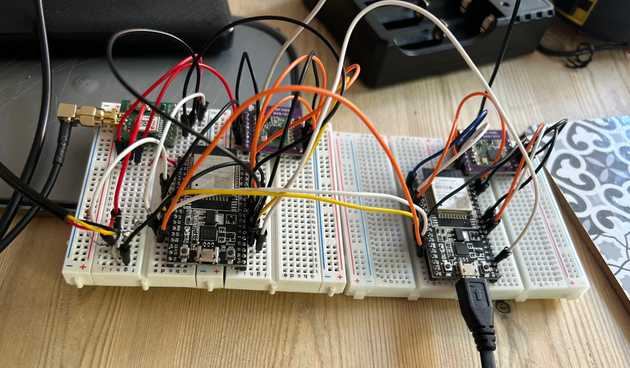
Here’s what my two connected ESP32s look like:
I have decided to connect my ESP32 boards using the HSPI pins, as the VSPI pins on my master board are in use with another component.
Transferring data between the two ESP32s
With the pins wired in place, the coding can begin. My project at this point contains quite a bit of code, so the below will only include the relevant code to show how the SPI data transfer works. I am using a library called lora-serialization to send my data from the ESP32 to a gateway on The Things Network (which I covered in a separate post in more detail), and I’ll leave that part in the examples below.
Sending data from the master device
#include <Arduino.h>
#include <HardwareSerial.h>
#include <SPI.h>
#include "LoraMessage.h"

#define HSPI_SS_PIN 15
SPIClass *hspi = NULL;

// Declarations (PlatformIO only)
void sendToEsp32Slave(SPIClass *spi, byte data[], int length);

void setup() {
    Serial.begin(115200);

    // ESP32 slave setup
    hspi = new SPIClass(HSPI);
    hspi->begin();
    pinMode(HSPI_SS_PIN, OUTPUT);

    // Initialize other components ...
}

void loop() {
    LoraMessage message;
    message.addLatLng(52.4204338, -1.9605916);

    sendToEsp32Slave(hspi, message.getBytes(), message.getLength());

    delay(1000);
}

void sendToEsp32Slave(SPIClass *spi, byte data[], int length) {
    spi->beginTransaction(SPISettings(1000000, MSBFIRST, SPI_MODE0));
    digitalWrite(spi->pinSS(), LOW); //pull SS low get slave ready for transfer

    spi->transfer(data, length);
    digitalWrite(spi->pinSS(), HIGH); //pull SS high to show end of transfer

    spi->endTransaction();
}
The loop will contain your data input - in my case I’m sending GPS coordinates. These coordinates are added to the LoraMessage instance which is really useful because it converts the data to bytes and provides a useful method to get the total message byte length. The bytes and byte length are both needed to transfer data with SPI.
I have made a function called sendToEsp32Slave which takes the data and initiates the SPI transfer process. Note how the digitalWrite is used to pull the SS pin low to begin the transfer, and high to stop the transfer.
Receiving data on the peripheral device
#include <Arduino.h>
#include <SPI.h>
#include <ESP32SPISlave.h>

ESP32SPISlave slave;

static constexpr uint32_t BUFFER_SIZE {8};
uint8_t spi_slave_tx_buf[BUFFER_SIZE];
uint8_t spi_slave_rx_buf[BUFFER_SIZE];

void printHex(uint8_t num) {
    char hexCar[2];

    sprintf(hexCar, "%02X", num);
    Serial.print(hexCar);
}

void setup() {
	// Init slave connection to the master ESP32 sending us GPS data
	slave.setDataMode(SPI_MODE0);
	slave.begin(HSPI);

	// Clear buffers
	memset(spi_slave_tx_buf, 0, BUFFER_SIZE);
	memset(spi_slave_rx_buf, 0, BUFFER_SIZE);

}

void loop() {
    // Block until the transaction comes from master
    slave.wait(spi_slave_rx_buf, spi_slave_tx_buf, BUFFER_SIZE);

    while (slave.available()) {
        // Show received data
        for (size_t i = 0; i < BUFFER_SIZE; ++i) {
            // printf("%d ", spi_slave_rx_buf[i]);
            printHex(spi_slave_rx_buf[i]);
        }

        printf("\n");

        slave.pop();
    }


}
The receiving peripheral end requires a bit more work to receive the data. There’s a useful library called ESP32SPISlave which handles a lot of the work for us.
The example sketch provided by the library is what I used above, however I also added a small function called printHex which prints the hex values from the incoming buffer. This is useful to see what data is being received.
And that’s it! Thanks for reading.
Senior Engineer at Haven


